Oracle GoldenGate Cloud Service (GGCS) can populate data into Oracle Business Intelligence Cloud Service (BICS) from On-Premise and in Cloud. Please read Mike Papio's technical white paper. You will learn how to configure GGCS to load data from on-premise database in real-time to BICS to create real-time reporting services.
|
If you didn't select the Enable Oracle GoldenGate option when provisioning the Database Cloud Service, you can run the the setup script manually. [1] You first need to check the GoldenGate status with the dbaascli gg status command:
> dbaascli gg status
DBAAS CLI version 1.0.0
Executing command gg status
Golden Gate status: disabled
> quit
If it shows disabled, you can enable Oracle GoldenGate replication by running the dbaascli gg setup command shown as follows:
$ dbaascli gg setup
DBAAS CLI version 1.0.0
Executing command gg setup
Enter Golden Gate admin username: ggadmin
Enter Golden Gate admin password:
Re-enter Golden Gate admin password:
Setting up Golden Gate
Updating the registry
Successfully setup GG
This script creates a SQL script at the /var/opt/oracle/gg directory which is used to enable GoldenGate replication. An example SQL script for Oracle Database 11g is shown as follows:
ORCL11g.sql
-- -----------------------------------------------
-- Enable Supplemental Logging and Archive Logging
-- -----------------------------------------------
SHUTDOWN ABORT;
STARTUP PFILE=/u01/app/oracle/product/11.2.0/dbhome_1/dbs/s_ORCL11
g.ora MOUNT EXCLUSIVE;
ALTER DATABASE ADD SUPPLEMENTAL LOG DATA;
ALTER DATABASE ARCHIVELOG;
ALTER DATABASE FORCE LOGGING;
ALTER DATABASE OPEN;
ALTER SYSTEM SWITCH LOGFILE;
ALTER SYSTEM SET ENABLE_GOLDENGATE_REPLICATION=TRUE scope=both;

-- ------------------------------------------------------------
-- Set STREAMS_POOL_SIZE to 10% of SGA_MAX_SIZE
-- If SGA_MAX_SIZE is zero, set it to a default of 16MB
-- GoldenGate installation will contain a readme file
-- for the customer to know how to modify this from GoldenGate.
-- ------------------------------------------------------------
DECLARE
  sga_max_size_strvalue VARCHAR2(4000);
  sga_max_size_value NUMBER;
  str_pool_size NUMBER;
  str_pool_size_command VARCHAR2(200);
BEGIN

  -- Check the current value of SGA_MAX_SIZE
  SELECT VALUE INTO sga_max_size_strvalue FROM v$parameter WHERE N
AME = 'sga_max_size';
  sga_max_size_value := TO_NUMBER(sga_max_size_strvalue);

  -- Make STREAMS_POOL_SIZE 10% of SGA_MAX_SIZE
  str_pool_size := sga_max_size_value * 0.1;

  -- If str_pool_size is zero, set it to a default of 16M
  IF str_pool_size = 0 THEN
    str_pool_size := 16 * 1024 * 1024;
  END IF;

  -- Execute ALTER SYSTEM
  EXECUTE IMMEDIATE 'ALTER SYSTEM SET STREAMS_POOL_SIZE=' || str_p
ool_size || ' scope=both';
END;
/

-- -----------------------------
-- Create Tablespace for GGADMIN
-- -----------------------------
CREATE TABLESPACE gg_tbls_targetdb DATAFILE 'gg_tbls_targetdb.dbf'
 SIZE 100M REUSE AUTOEXTEND ON extent management local uniform siz
e 256k;

SET VERIFY OFF

-- ---------------------------
-- Create Default GGADMIN user
-- ---------------------------
create user &1 identified by "&2" default tablespace gg_tbls_targe
tdb quota unlimited on gg_tbls_targetdb;
grant dba, resource, unlimited tablespace, create session, alter s
ession, connect to &1;
exec dbms_goldengate_auth.grant_admin_privilege(grantee => '&1');
Notes:
An example SQL script for Oracle Database 11g is shown as follows:
ORCL12c.sql:
-- -----------------------------------------------
-- Enable Supplemental Logging and Archive Logging
-- -----------------------------------------------
SHUTDOWN NORMAL;
STARTUP PFILE=/u01/app/oracle/product/12.1.0/dbhome_1/dbs/s_ORCL12c.ora MOUNT EX
CLUSIVE;
ALTER DATABASE ADD SUPPLEMENTAL LOG DATA;
ALTER DATABASE ARCHIVELOG;
ALTER DATABASE FORCE LOGGING;
ALTER DATABASE OPEN;
ALTER SYSTEM SWITCH LOGFILE;
ALTER SYSTEM SET ENABLE_GOLDENGATE_REPLICATION=TRUE scope=both;

-- ------------------------------------------------------------
-- Set STREAMS_POOL_SIZE to 10% of SGA_MAX_SIZE
-- If SGA_MAX_SIZE is zero, set it to a default of 16MB
-- GoldenGate installation will contain a readme file
-- for the customer to know how to modify this from GoldenGate.
-- ------------------------------------------------------------
DECLARE
  sga_max_size_strvalue VARCHAR2(4000);
  sga_max_size_value NUMBER;
  str_pool_size NUMBER;
  str_pool_size_command VARCHAR2(200);
BEGIN

  -- Check the current value of SGA_MAX_SIZE
  SELECT VALUE INTO sga_max_size_strvalue FROM v$parameter WHERE NAME = 'sga_max
_size';
  sga_max_size_value := TO_NUMBER(sga_max_size_strvalue);

  -- Make STREAMS_POOL_SIZE 10% of SGA_MAX_SIZE
  str_pool_size := ceil(sga_max_size_value * 0.1);

  -- If str_pool_size is zero, set it to a default of 16M
  IF str_pool_size = 0 THEN
    str_pool_size := 16 * 1024 * 1024;
  END IF;

  -- Execute ALTER SYSTEM
  EXECUTE IMMEDIATE 'ALTER SYSTEM SET STREAMS_POOL_SIZE=' || str_pool_size || '
scope=both';
END;
/

SHOW CON_NAME;
SET VERIFY OFF

-- ---------------------------
-- Create Default GGADMIN user
-- ---------------------------
create user &1 identified by "&2" container = ALL;

grant connect, resource, unlimited tablespace, alter session, select_catalog_rol
e to &1;
grant dba to &1;
grant create session to &1 container = ALL;
grant set container to &1 container = ALL;
grant select any dictionary to &1 container = ALL;

exec dbms_goldengate_auth.grant_admin_privilege(grantee => '&1', container => 'A
LL');
What should I do if I get the "ORA-03113: end-of-file on communication channel, Process: 5777 error?"
Details: After running the Oracle setup script with an DBaaS already enabled GoldenGate, you can cause the redo log issue and receive the following error: sqlplus /nolog SQL*Plus: Release 11.2.0.4.0 Production on Thu Jul 7 10:51:17 2016 Copyright (c) 1982, 2013, Oracle. All rights reserved. SQL> connect / as sysdba Connected to an idle instance. SQL> startup ORACLE instance started. Total System Global Area 3206836224 bytes Fixed Size 2257520 bytes Variable Size 1811942800 bytes Database Buffers 1375731712 bytes Redo Buffers 16904192 bytes Database mounted. ORA-03113: end-of-file on communication channel Process ID: 5777 Session ID: 125 Serial number: 5Answer:To fix this, run the following command: SQL> connect / as sysdba Connected to an idle instance. SQL> startup mount ORACLE instance started. Total System Global Area 3206836224 bytes Fixed Size 2257520 bytes Variable Size 1811942800 bytes Database Buffers 1375731712 bytes Redo Buffers 16904192 bytes Database mounted. SQL> alter database clear unarchived logfile group 1; Database altered. SQL> alter database clear unarchived logfile group 2; Database altered. SQL> alter database clear unarchived logfile group 3; Database altered. SQL> shutdown immediate; ORA-01109: database not open Database dismounted. ORACLE instance shut down. SQL> startup ORACLE instance started. Total System Global Area 3206836224 bytes Fixed Size 2257520 bytes Variable Size 1811942800 bytes Database Buffers 1375731712 bytes Redo Buffers 16904192 bytes Database mounted. Database opened.
Created: 8/8/2016 Last Updated: 2/27/2017
Oracle GoldenGate extract and replicat configurations need database login information to connect to the source and target database. To protect the database user IDs and passwords information, you can use the credential store introduced in Oracle GoldenGate 12c. With a credential store, Oracle GoldenGate can define useridalias for database logins. This makes the setup easier and protects the login details. For GGCS configuration, it's recommended to use the credential store.
To configure the credential store, you needs the following commands: GGSCI> add credentialstore Credential store created in ./dircrd/. GGSCI> alter credentialstore delete user ggadmin Credential store in ./dircrd/ altered. GGSCI> alter credentialstore add user c##ggadmin@source alias ggadmin Password: Credential store in ./dircrd/ altered. GGSCI> dblogin useridalias ggadmin Successfully logged into database CDB$ROOT. GGSCI> alter credentialstore add user c##ggadmin@target alias ggadmin_tgt Password: Credential store in ./dircrd/ altered. GGSCI> dblogin useridalias ggadmin_tgt Successfully logged into database CDB$ROOT. GGSCI> info credentialstore Reading from ./dircrd/: Default domain: OracleGoldenGate Alias: ggadmin Userid: c##ggadmin@source Alias: ggadmin_tgt Userid: c##ggadmin@target
Credential Store location is specified via the CREDENTIALSTORELOCATION parameter file in the GLOBALS parameter file or the default location is dircrd directory.
The @target SQL*Net connection is configured by default in GGCS. To enable capture, you need to create a new SQL*Net connection shown as follows:
[oracle@pm-ggcs12c-ggcs-1 gghome]$ more /u01/app/oracle/oci/network/admin/tnsnames.ora
#GGCS generated file
source =
      (DESCRIPTION =
          (ADDRESS_LIST =
              (ADDRESS = (PROTOCOL = TCP)(HOST = PM-DBaaS12c)(PORT = 1521))
      )
      (CONNECT_DATA =
      (SERVICE_NAME = ORCL12c.a425731.oraclecloud.internal)
    )
 )

target =
      (DESCRIPTION =
          (ADDRESS_LIST =
              (ADDRESS = (PROTOCOL = TCP)(HOST = PM-DBaaS12c)(PORT = 1521))
      )
      (CONNECT_DATA =
      (SERVICE_NAME = PDB1.a425731.oraclecloud.internal)
    )
 )
The c##ggadmin is the user created by default on the DBaaS instance to enable Oracle GoldenGate replication.
Created: 11/3/2016 Last Updated: 2/20/2017
Oracle GoldenGate Cloud Service (GGCS) 16.4.5 was released. In this version, GGCS includes the following new features and certifications:
Let's discuss how to create an Oracle GoldenGate Replication Hub on AWS EC2. The followings will be discussed:
1. Installing Oracle GoldenGate
After an E2 service is provisioned, you can use SFTP to send the Oracle GoldenGate software to the EC2 instance. > sftp -i < private_key> <ec2-user@ec2_ip_address>
Then, you need to use OUI to install Oracle GoldenGate for Oracle Database. If there is no GUI access, you can choose the silent install option shown as follows:
./runInstaller -silent -responseFile <response_file>
Note that Oracle GoldenGate for Oracle Database has two installation options: ORA12c and ORA11g. You need to tell OUI installer which option to choose in the response file. The followings are the example response files for Oracle GoldenGate Silent Installation. You can update the installation location etc. based on your environment.
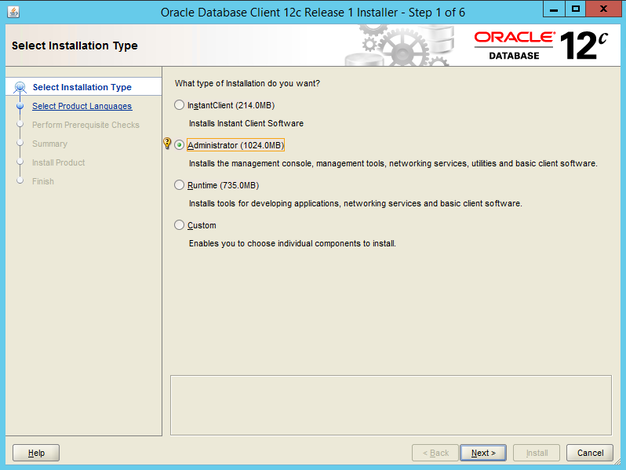
2. Installing Oracle Database Client
You need to install Oracle Database Client to connect to a source or target database from Oracle GoldenGate. Based on which database the Oracle GoldenGate instance will be used to capture and deliver data, you install different version of the Oracle Database Client. In the example, I installed both Oracle Database Client for 11g and 12c so that the Oracle GoldenGate Replication Hub can work with both Oracle Database 11g and 12c in RDS.
Do I need to install full Oracle Database for Oracle GoldenGate remote capture and delivery?
Answer: No, you need only need the "Administrator" Oracle Database Client?
When installing the Oracle Database Client, please choose the Administrator option shown as follows:
Why do I get the "ggsci: error while loading shared libraries: libnnz12.so: cannot open shared object file: No such file or directory" error?
Answer: Please make sure you choosed the Administrator option when installing the Oracle Database Client. If you install with InstanceClient option, you could get this error.
3. Configuring Oracle GoldenGate
In the following example, we use the Oracle Database 12c client to work with Oracle Database 12c on RDS as the example. After softwares are installed, you then need to set up the LD_LIBRARY_PATH environment variable to run GGSCI, the command-line utility for Oracle GoldenGate:
export LD_LIBRARY_PATH=<oracle_db_12_client_directory>
As required by GoldenGate installation, you then need to create sub-directories, and start the GoldenGate manager:
$ ./ggsci
Oracle GoldenGate Command Interpreter for Oracle
Version 12.2.0.1.1 OGGCORE_12.2.0.1.0_PLATFORMS_151211.1401_FBO
Linux, x64, 64bit (optimized), Oracle 11g on Dec 12 2015 00:54:38
Operating system character set identified as UTF-8.
Copyright (C) 1995, 2015, Oracle and/or its affiliates. All rights reserved.

GGSCI> create subdirs
GGSCI > edit param mgr
Port 7865

GGSCI> start mgr
Manager started.

GGSCI> info mgr
Manager is running (IP port ip-172-30-3-169.ec2.internal.7865, Process ID 9108).
4. Preparing the Data Replication
With GoldenGate manager started, you can perform a simple database connection validate to prepare the replication. The following example checks an RDS database connection:
$ export ORACLE_HOME=<gg_install_home>
$ ./ggsci
Oracle GoldenGate Command Interpreter for Oracle
Version 12.2.0.1.1 OGGCORE_12.2.0.1.0_PLATFORMS_151211.1401_FBO
Linux, x64, 64bit (optimized), Oracle 12c on Dec 12 2015 02:56:48
Operating system character set identified as UTF-8.
Copyright (C) 1995, 2015, Oracle and/or its affiliates. All rights reserved.

GGSCI> dblogin userid <rds_master_user_name>@<rds_endpoint>:<rds_sqlnet_port>/<rds_db_sid> password ***
Successfully logged into database.
Why do I get the "OGG-02550 ORACLE_HOME is not set to Oracle software directory." error?
Answer: This is because you need to set up the ORACLE_HOME environment variable to point to Oracle GoldenGate installation home.
5. AMI Image
The result setup is created as an AMI image with the followings:
6. Resources
Editing Notes: Created: 6/17/2016 Last Updates: 12/9/2016
If you have two Oracle Database Cloud Services, you can use GGCS to replicat data from one to the other. The following example replicates data from a PDB in Oracle Database 12c to an Oracle 11g database.
First, you need to provision DBaaS and GGCS instances on both the source and the target.After the provisioning, you should have:
You then need to start the SOCKS5 Proxy with SSH connection from the source to the target DBaaS machine shown as follows:
sudo ssh -f -N -i ~/.ssh/jinyu_opc -v -D 127.0.0.1:9000 [email protected]
Then, you can configure the GoldenGate replication parameter files on the source.
extgdrds.prm: extract extgdrds useridalias ggadmin EXTTRAIL ./dirdat/od ddl include all ddloptions addtrandata,getreplicates, report TABLE pdb1.pmdemo.*; pmpgdrds.prm extract pmpgdrds RMTHOST 129.152.156.178, MGRPORT 7744,socksproxy 127.0.0.1:9000 discardfile ./dirrpt/pumgdop.dsc, purge RMTTRAIL ./dirdat/od PASSTHRU TABLE pdb1.pmdemo.member;
Next, you can create and run GoldenGate obey file to created the extract and pump processes:
GGSCI> obey dirprm/del_gdrds.oby
stop *
pause 5
info all
sh ls ./dirdat
sh rm ./dirdat/od*
sh ls ./dirdat
dblogin useridalias ggadmin
unregister extract extgdrds database
pause 5
delete extgdrds!
delete pmpgdrds!
info all

GGSCI> obey dirprm/add_extgdrds.oby
dblogin useridalias ggadmin
add extract extgdrds integrated tranlog, begin now
add exttrail ./dirdat/od extract extgdrds
register extract extgdrds database container(PDB1)
pause 5
start extgdrds
pause 25
info extgdrds
info all

GGSCI> obey dirprm/add_pmpgdrds.oby
ADD EXTRACT pmpgdrds EXTTRAILSOURCE ./dirdat/od BEGIN NOW
ADD RMTTRAIL ./dirdat/od EXTRACT pmpgdrds
start pmpgdrds
pause 10
info pmpgdrds
info all
You can start the extract process and pump process before going to the target to configure the replicat.
To add the replicat on the target side, you can set the replicat as follows: repgdopc.prm replicat repgdopc useridalias ggadmin dboptions integratedparams(parallelism 2) discardfile ./dirrpt/repgdrds.dsc,append megabytes 50 ddl include all map pdb1.pmdemo.*, TARGET pmdemo.*;
Then, you can run the obey file to create the replicat process:
GGSCI> obey dirprm/add_repgdopc.oby
add replicat repgdopc, integrated, exttrail ./dirdat/od
pause 10
info all
Start the replicat process. The one-way replication is then configured. You can insert new records on the source and the record should be replicat to the target by GGCS.
Why do I get the "OGG-08221 Cannot register or unregister EXTRACT EXTIN because of the following SQL error: OCI Error 6,550." error?
Answer:This is normally because you use the wrong version of Oracle GoldenGate for the database. For example, you use Oracle GoldenGate for 12c Database to configure for Oracle Database 11g.
Why do I get the " ERROR OGG-00662 OCI Error ORA-01950: no privileges on ta blespace 'USERS'" error?
Answer: You need to grant the user(i.e. pmdemo user) the quota on USERS tablespace with the alter user pmdemo quota 10M on users; command. How to Configure a One-Way Replication from an Oracle DB on AWS RDS to Oracle Database Cloud Service11/2/2016
Let's go through an example to explain how to replicate data for Oracle Databases from AWS Relational Database Servcie (RDS) to Oracle Public Cloud (OPC).
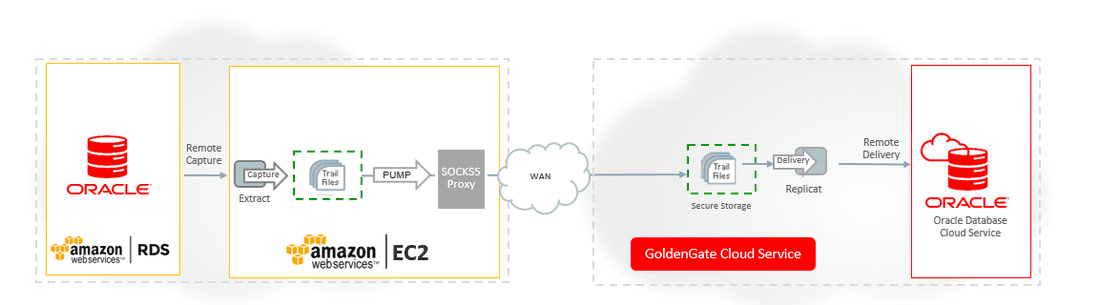
The following is the example setup:
1. Configure the Source and Target Databases
The source database is a Oracle 12c database hosted on Amazon AWS RDS. We can connect to the database as shown from the EC2 instance:
> sqlplus awsuser/[password]@[rdshostname.com]:1521/ORCL12C

SQL*Plus: Release 12.1.0.2.0 Production on Wed Nov 2 22:51:52 2016
Copyright (c) 1982, 2014, Oracle.  All rights reserved.
Last Successful login time: Wed Nov 02 2016 22:41:24 -04:00
Connected to:
Oracle Database 12c Enterprise Edition Release 12.1.0.2.0 - 64bit Production
With the Partitioning, OLAP, Advanced Analytics and Real Application Testing options
Create one example member table for the replication:
SQL> create table member (id number(4) primary key, name varchar2(25), region varchar2(15));
Table created.

SQL> desc member;
 Name                                      Null?    Type
 ----------------------------------------- -------- ----------------------------
 ID                                        NOT NULL NUMBER(4)
 NAME                                               VARCHAR2(25)
 REGION                                             VARCHAR2(15)
The target database is a Oracle 11g database hosted on Oracle Public Cloud.
[oracle@PM-DBaaS11g ~]$ sqlplus ggadmin/[password]
SQL*Plus: Release 11.2.0.4.0 Production on Thu Nov 3 02:45:36 2016
Copyright (c) 1982, 2013, Oracle.  All rights reserved.
Connected to:
Oracle Database 11g EE Extreme Perf Release 11.2.0.4.0 - 64bit Production
With the Partitioning, Oracle Label Security, OLAP, Data Mining,
Oracle Database Vault and Real Application Testing options

SQL> create user pmdemo identified by [password];
User created.

SQL>  grant connect, resource to pmdemo;
Grant succeeded.

SQL> connect pmdemo/pmdemo
Connected.
SQL> create table member (id number(4) primary key, name varchar2(25), region varchar2(15));
Table created.

SQL> desc member
 Name                                      Null?    Type
 ----------------------------------------- -------- ----------------------------
 ID                                        NOT NULL NUMBER(4)
 NAME                                               VARCHAR2(25)
 REGION                                             VARCHAR2(15)
2. Configure the Capture on EC2
Start the SOCK5 Proxy as follows:
sudo ssh -N -i ~/.ssh/[private_key] -v -D 127.0.0.1:9000 [email protected]
With Oracle GoldenGate 12.2 installed on EC2 and GoldenGate capture enabled on RDS , we create the following GoldenGate extract and pump process.
extgdrds.prm:
extract extgdrds
useridalias awsuser
EXTTRAIL ./dirdat/rd
ddl include all
ddloptions addtrandata, report
TABLE awsuser.*;
pmpgdrds.prm: extract pmpgdrds RMTHOST 129.152.156.178, MGRPORT 7744, socksproxy 127.0.0.1:9000 discardfile ./dirrpt/pumgdop.dsc, purge RMTTRAIL ./dirdat/rd PASSTHRU TABLE awsuser.*;
Adding the extract and pump groups:
del_gdrds.oby:
stop *!
pause 5
info all
sh ls ./dirdat
sh rm ./dirdat/rd*
sh ls ./dirdat
dblogin useridalias awsuser
unregister extract extgdrds database
pause 5
delete extgdrds!
delete pmpgdrds!
info all
add_extgdrds.oby: dblogin useridalias awsuser add extract extgdrds integrated tranlog, begin now add exttrail ./dirdat/rd extract extgdrds register extract extgdrds database pause 5 start extgdrds pause 25 info extgdrds info alladd_pmpgdrds.oby ADD EXTRACT pmpgdrds EXTTRAILSOURCE ./dirdat/rd BEGIN NOW ADD RMTTRAIL ./dirdat/rd EXTRACT pmpgdrds start pmpgdrds pause 10 info pmpgdrds info all GGSCI> obey dirprm/del_gdrds.oby GGSCI> obey dirprm/add_extgdrds.oby GGSCI> obey dirprm/add_pmpgdrds.oby
You should see both group running:
GGSCI>info all
Program     Status      Group       Lag at Chkpt  Time Since Chkpt
MANAGER     RUNNING
EXTRACT     RUNNING     EXTGDRDS    00:01:58      00:00:02
EXTRACT     RUNNING     PMPGDRDS    00:00:00      00:00:00
You need to add trandata to the MEMBER table:
GGSCI (ip-172-30-3-169.ec2.internal as awsuser@ORCL12C) 53> add trandata awsuser.member
Logging of supplemental redo log data is already enabled for table AWSUSER.MEMBER.
TRANDATA for instantiation CSN has been added on table 'AWSUSER.MEMBER'.
3. Configure the Delivery on GGCS
We create the following replicat group:
repgdopc.prm:
replicat repgdopc
useridalias ggadmin
dboptions integratedparams(parallelism 2)
discardfile ./dirrpt/repgdrds.dsc,append megabytes 50
ddl include all
map awsuser.*, TARGET pmdemo.*;
del_repgdopc.oby: stop *! pause 5 info all sh ls ./dirdat sh rm ./dirdat/rd* sh ls ./dirdat pause 5 delete repgdopc! info all add_repgdopc.oby: add replicat repgdopc, integrated, exttrail ./dirdat/rd start repgdopc pause 10 info all GGSCI> obey dirprm/add_repgdopc.oby
You should see the replicat group running:
GGSCI (pm-ggcs11g-ggcs-1) 9> info all
Program     Status      Group       Lag at Chkpt  Time Since Chkpt
MANAGER     RUNNING
REPLICAT    RUNNING     REPGDOPC    00:00:00      00:00:05
4. Testing the DML Replication
Insert a record on the source and theh DML operation will be prelicate to the target.
5. Test the DDL Replication
AWS DB:
SQL> create table purch_hist(user_id number(4), item_name varchar2(10)); OPC DB: SQL> desc purch_hist; Name Null? Type ----------------------------------------- -------- ---------------------------- USER_ID NUMBER(4) ITEM_NAME VARCHAR2(10)
Now, this concludes this example which configures an one-way real-time replication from Oracle DB on RDS to Oracle DB on OPC.
Created 3/22/2016, Last Updated: 11/2/2016
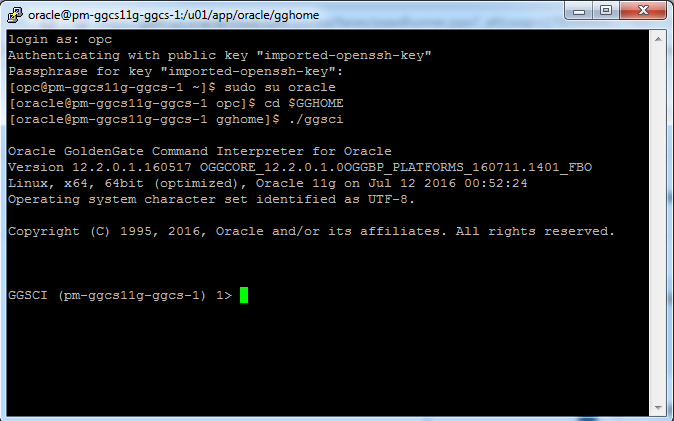
After GoldenGate Cloud Service (GGCS) is provisioned, you then can connect to the GGCS instance via SSH or SFTP using the Public IP of the GGCS virtual machine. Let's talk about the following topics:
From the GGCS management console, Clicking on the GGCS instance name will lead you to the GGCS instance detail page. You can find the Public IP of the GGCS instance on this page. 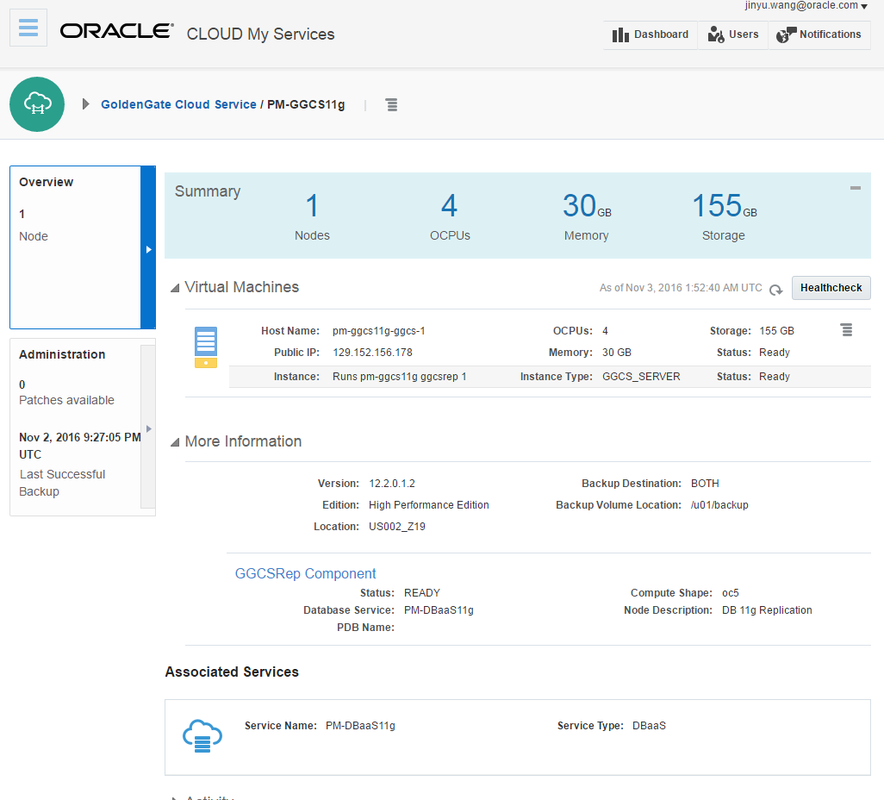
2. Setting up SSH Connections
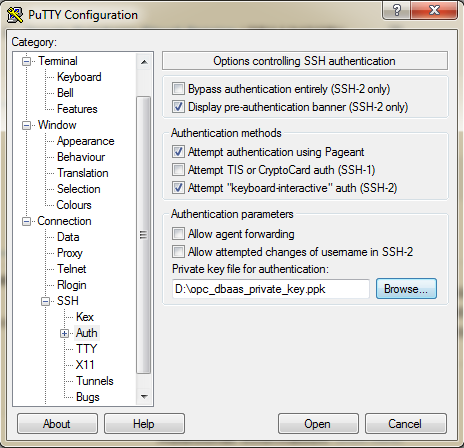
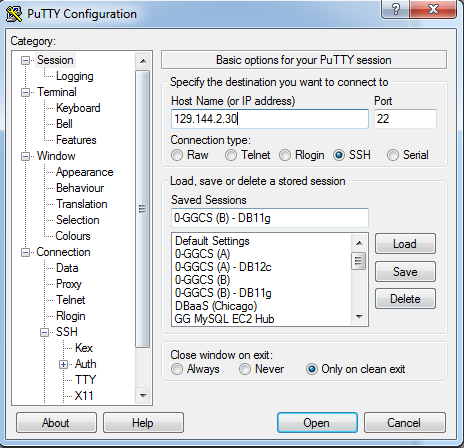
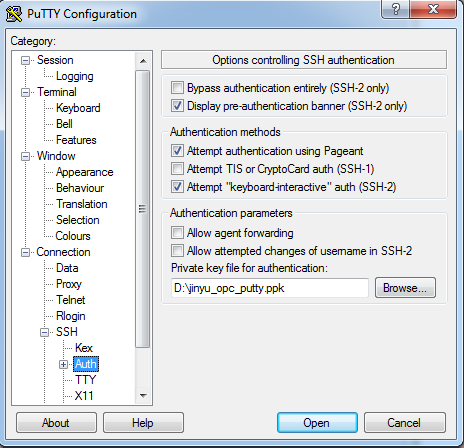
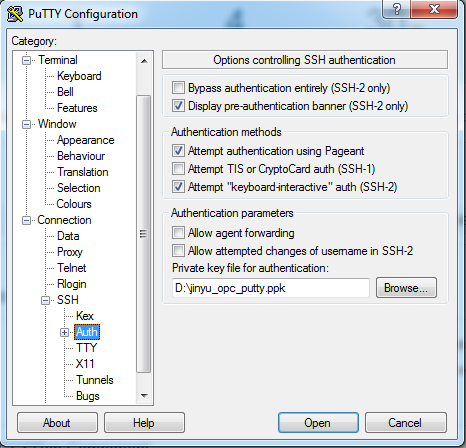
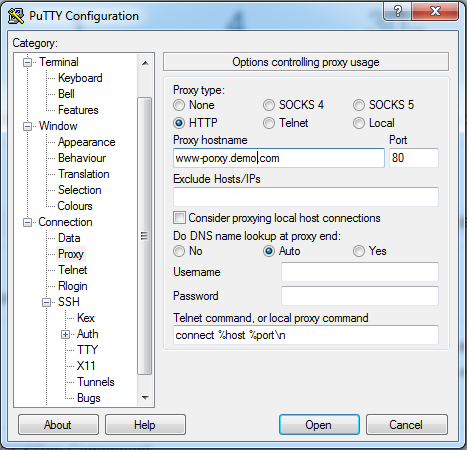
2.1 SSH Connection on Windows On Windows, you can use PuTTY to set up the SSH connection. After setting up the session connection information, you need to go to Connection | SSH and provide the private key for the authentication. If you are behind the firewall, you can add the proxy setup as needed. The connection user is opc. The setup steps are shown as follows:
2.2 SSH Connection on LINUX
On Linux access, you can use the ssh command-line tool. The following is an example. >ssh -i opc_rsa.txt [email protected]
There is a permission requirement for the private key file (opc_rsa.txt), i.e. setting it to be read only by the file owner. You then need to change the permission of the file shown as follows:
chmod 400 opc_rsa.txt
Otherwise, you will get the following error:
[ec2-user@ip-10-184-238-104 ~]$ ssh -i opc_rsa.txt [email protected]
The authenticity of host '129.144.2.34 (129.144.2.34)' can't be established.
RSA key fingerprint is 34:cc:f6:50:5e:dd:d5:31:35:bd:a1:81:88:fa:21:d6.
Are you sure you want to continue connecting (yes/no)? yes
Warning: Permanently added '129.144.2.34' (RSA) to the list of known hosts.
@@@@@@@@@@@@@@@@@@@@@@@@@@@@@@@@@@@@@@@@@@@@@@@@@@@@@@@@@@@
@         WARNING: UNPROTECTED PRIVATE KEY FILE!          @
@@@@@@@@@@@@@@@@@@@@@@@@@@@@@@@@@@@@@@@@@@@@@@@@@@@@@@@@@@@
Permissions 0664 for 'opc_rsa.txt' are too open.
It is required that your private key files are NOT accessible by others.
This private key will be ignored.
bad permissions: ignore key: opc_rsa.txt
Permission denied (publickey,gssapi-keyex,gssapi-with-mic).
3. Setting Up SFTP Connections
3.1 SFTP Connection on Windows SFTP access is useful when you'd like to backup files or install new software to GGCS virtual machine. To setup SFTP, you need to provide GGCS's public IP address along with the private key for authentication. An example connection is shown as follows: 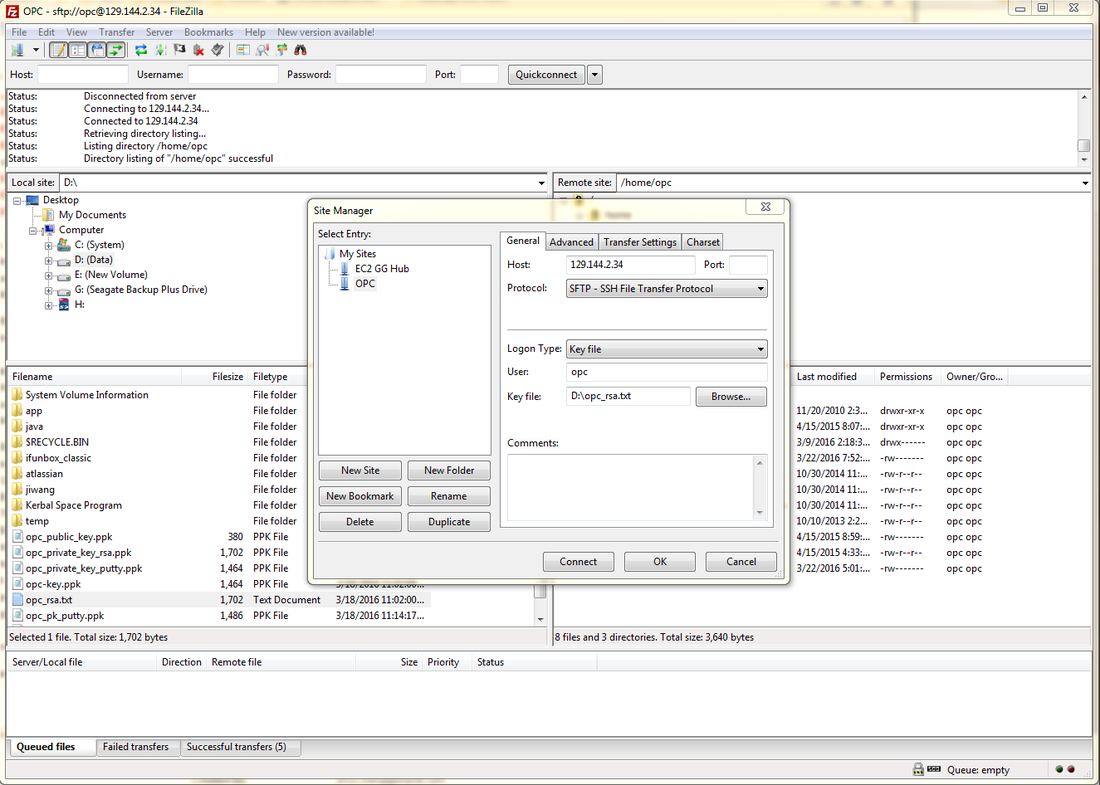
You can also use the sFTP command-line . The following is an example:
>sftp -i /home/ec2-user/opc_ggcs.sshkey [email protected]
Connected to 129.145.2.34.
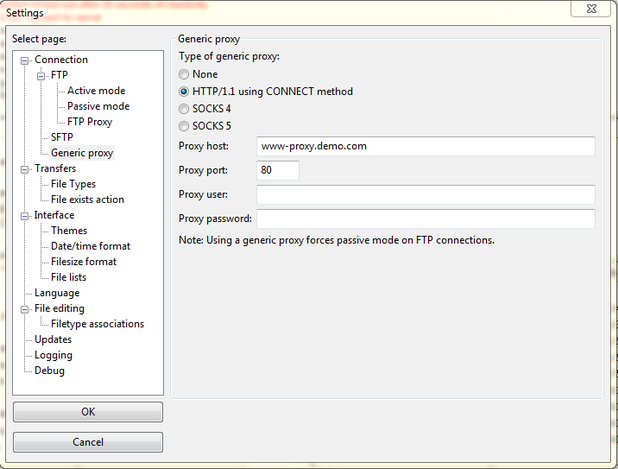
If you are behind a firewall, you need to setup a proxy for your SFTP connection. In FileZilla, you can click on the Edit | Setting Menu, and perform the setup in Connection | FTP | Generic Proxy. An example setup is shown as follows:
3.2 SFTP Connection on LINUX
The following is one example:
> sftp -i AWS-GG-Hub.pem [email protected]
Connected to 52.201.221.72.
sftp> put jinyu_opc
Uploading jinyu_opc to /home/ec2-user/jinyu_opc
jinyu_opc                                     100% 1766     1.7KB/s   00:00
sftp> ls
gg         jinyu_opc  oracle11   oracle12
sftp> exit
Created 3/19/2016, Last Updated: 11/2/2016
SSH key pairs include a private key and a public key. They are used to connect to GGCS, DBCS, and other cloud services via SSH. You can generate your private/public key pair before creating Oracle cloud services, or you can create when provisioning the cloud services. Let's discuss how you can generate SSH key pairs with ssh-keygen [2] command-line utility on LINUX and PuTTYgen on Windows.
Using the SSH-KEYGEN Command-Line Utility On Linux, you can create the SSH key pairs via the ssh-keygen utility. An example is shown as follows: $ ssh-keygen -t rsa Generating public/private rsa key pair. Enter file in which to save the key (/Users/Demo/.ssh/id_rsa): ggcs_opc Enter passphrase (empty for no passphrase): Enter same passphrase again: Your identification has been saved in ggcs_opc. Your public key has been saved in ggcs_opc.pub. The key fingerprint is: 6f:78:a4:a8:29:9c:ce:fb:41:38:d9:96:a9:75:21:2b ... The key's randomart image is: +--[ RSA 2048]----+ | . . | | o = . | | E B .. | | . *..= | | o. o S | |. oo o | |.oo. | |o. . | | +o. | +-----------------+
You will be asked to provide a passphrase which is a password for the key. It needs to be greater than 4 bytes.
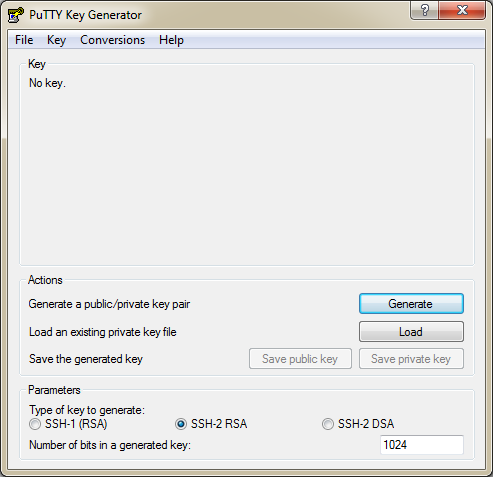
Using the PuTTYgen Utility PuTTgen is a tool provided along with PuTTY to generate the public and private key pair.[1] After you started the PuTTYgen, click on the Generate button to create the key. Then, you can specify and confirm the Key passphrase, and click on Save public key and Save private key buttons to save the generated keys to files. The steps are as follows: 
Why my PuTTY SSH connection can't use SSH generated private key?
Answer: PuTTY can't read the OpenSSH's SSH-2 private key files. Therefore, you need to use PuTTYgen (an RSA and DSA key generation utility) to convert OpenSSH private key files into PuTTY's format.
Make sure you remember the Key passphrase because this is needed when logging into the cloud service instances. It's also important to keep the key pair in a secure place especially the private key file.
Created: 3/20/2016 Last Updated: 11/2/2016
Let's talk about how to create and configure an Oracle Database Cloud Service instance for GGCS replications. We will discuss the following topics:
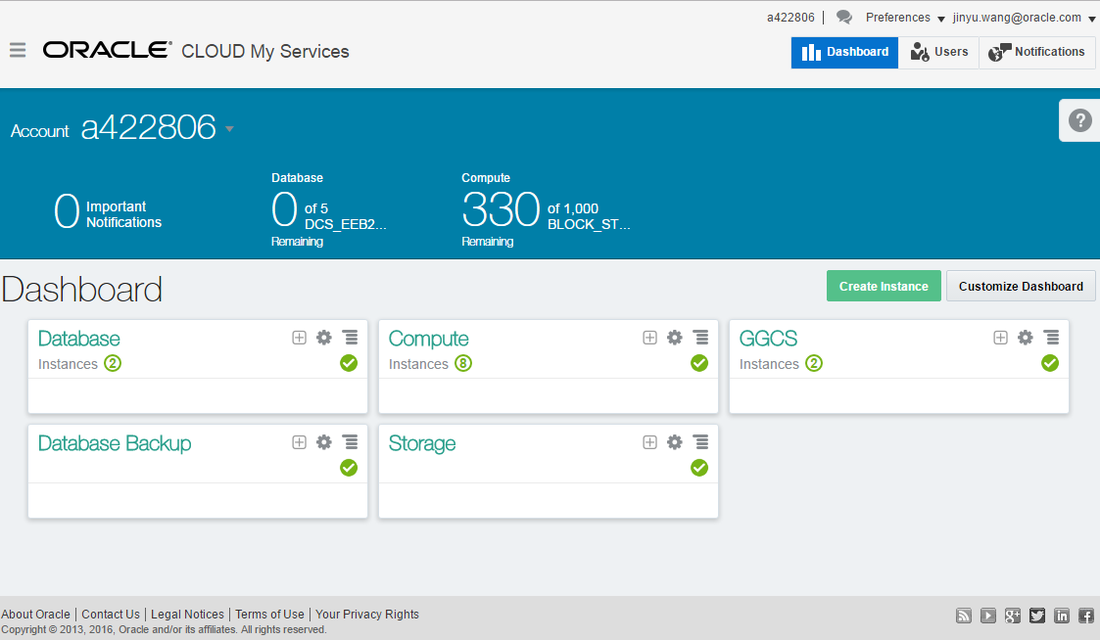
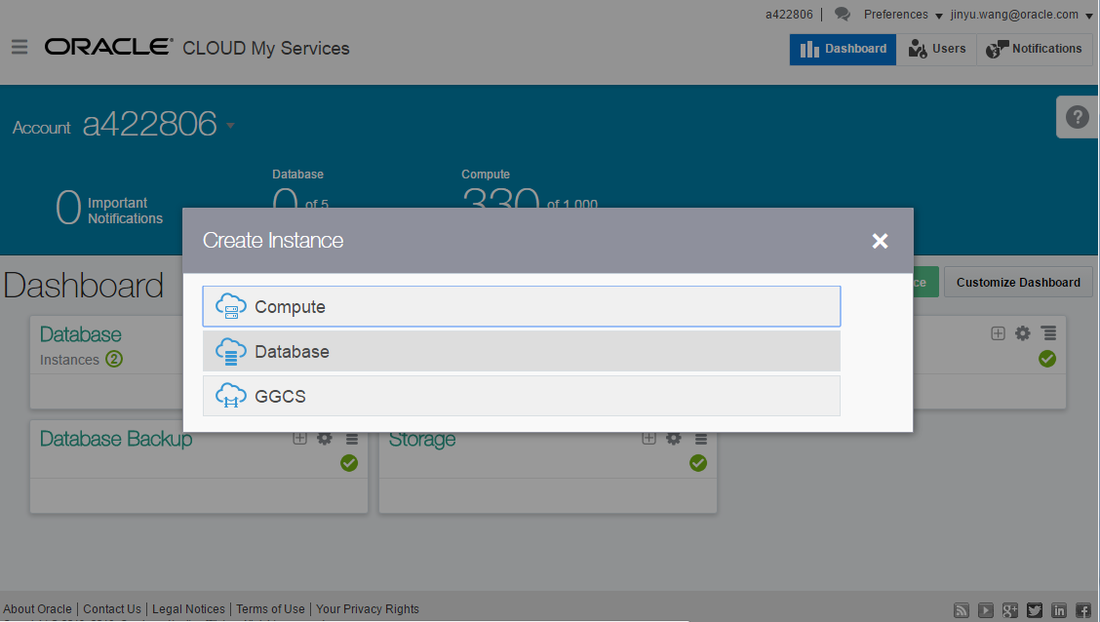
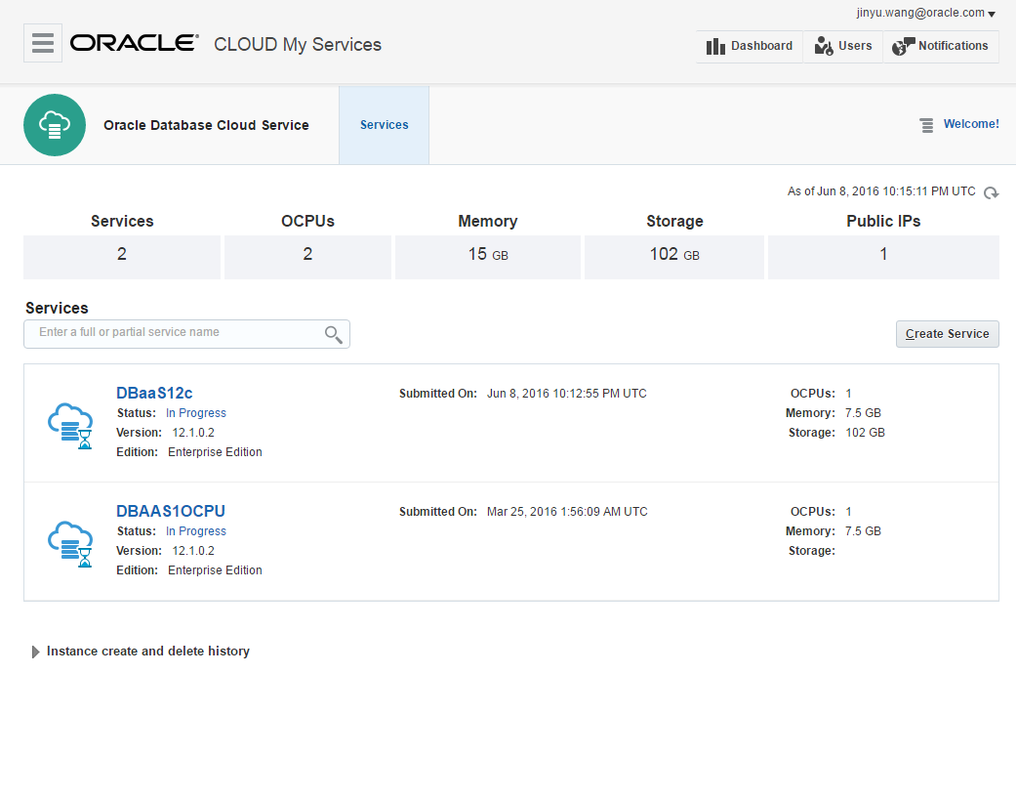
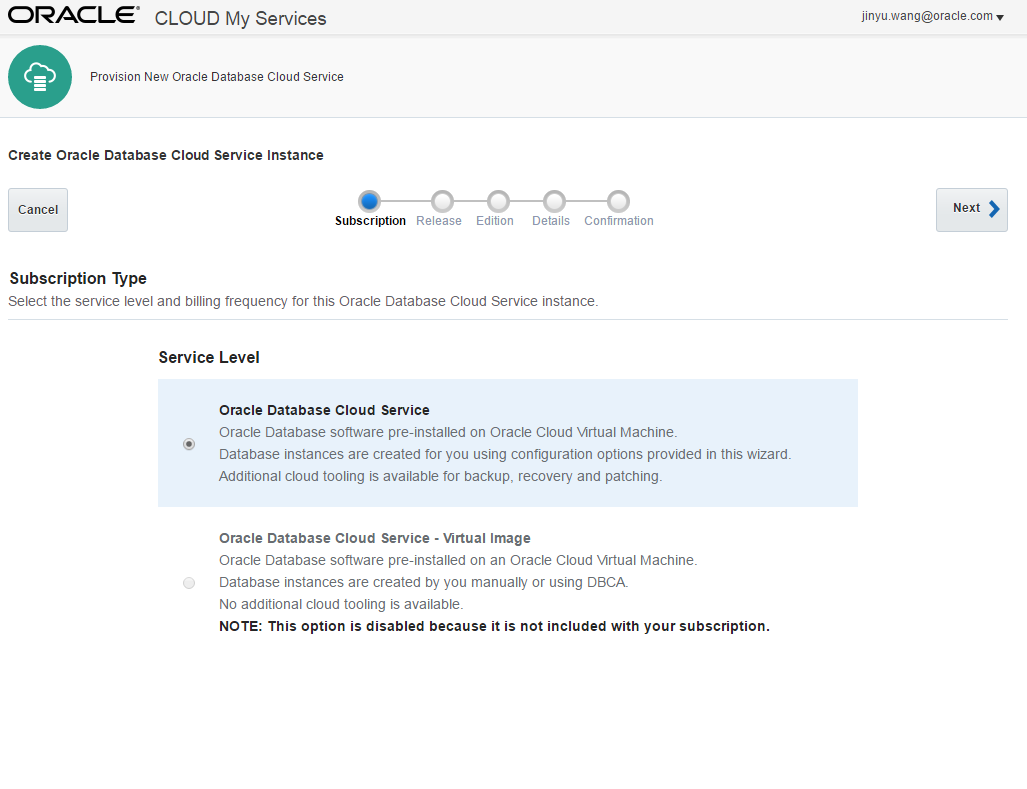
1. Provisioning Database Cloud Service
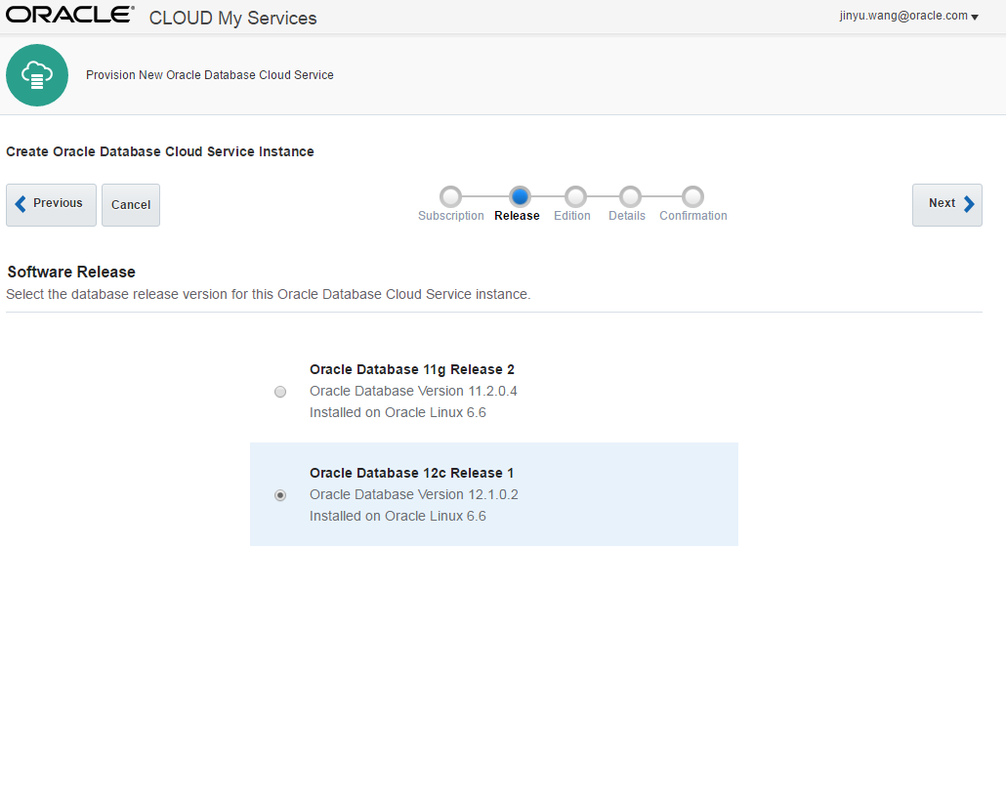
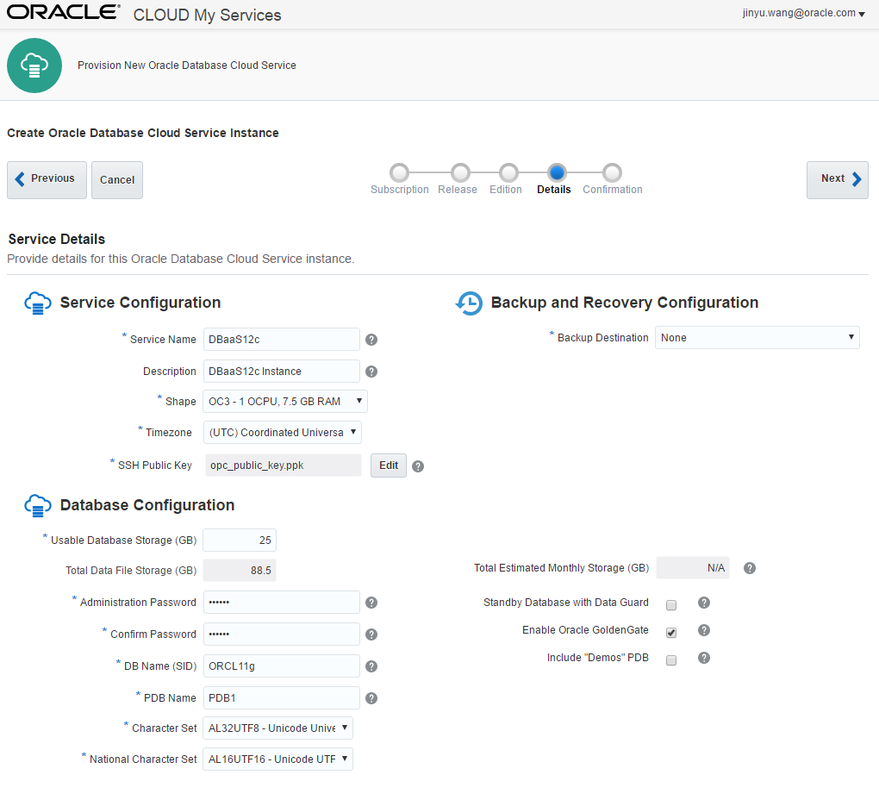
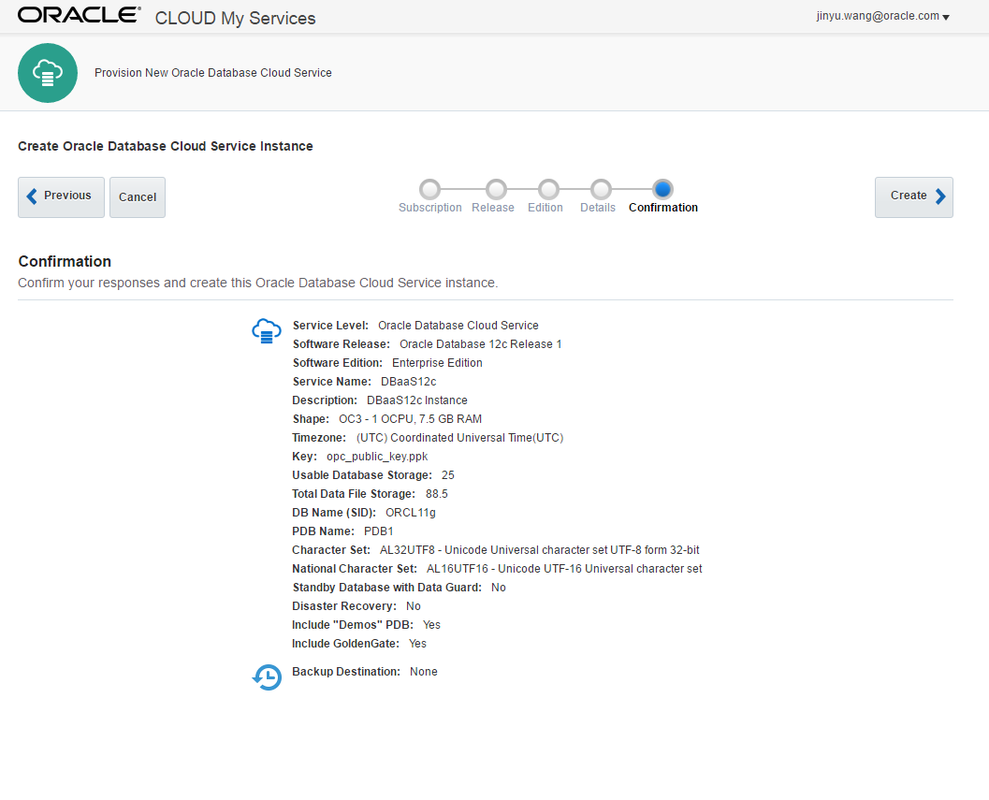
From the Oracle Cloud Dashboard, you now can click on the Create Instance button to create cloud service instances. When choosing to create Database Cloud Service, you will then get to the Database Cloud Service console. From the console, you can click on the Create Service button and then follow the UI workflow as shown to provision a new Database Cloud Service instance. To enable GoldenGate replications, you need to select Enable Oracle GoldenGate in the Details setup page.
The Oracle Database Cloud Service instance has the users GGADMIN (11g) or C##GGADMIN (12c) created for GGCS replications.
Tip: What happens if I didn't select the Enable Oracle GoldenGate option but want to have GoldenGate replication after provisioning the database cloud service instance?
Answer: You can still run the manual setup discussed at How To Manually Set Up Oracle GoldenGate in DBaaS. 2. Connecting to Database Cloud Service
After an Oracle Database Cloud Service instance is provisioned, you can connect to the database using the following options:
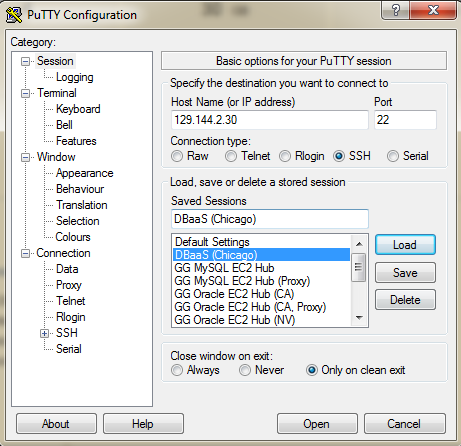
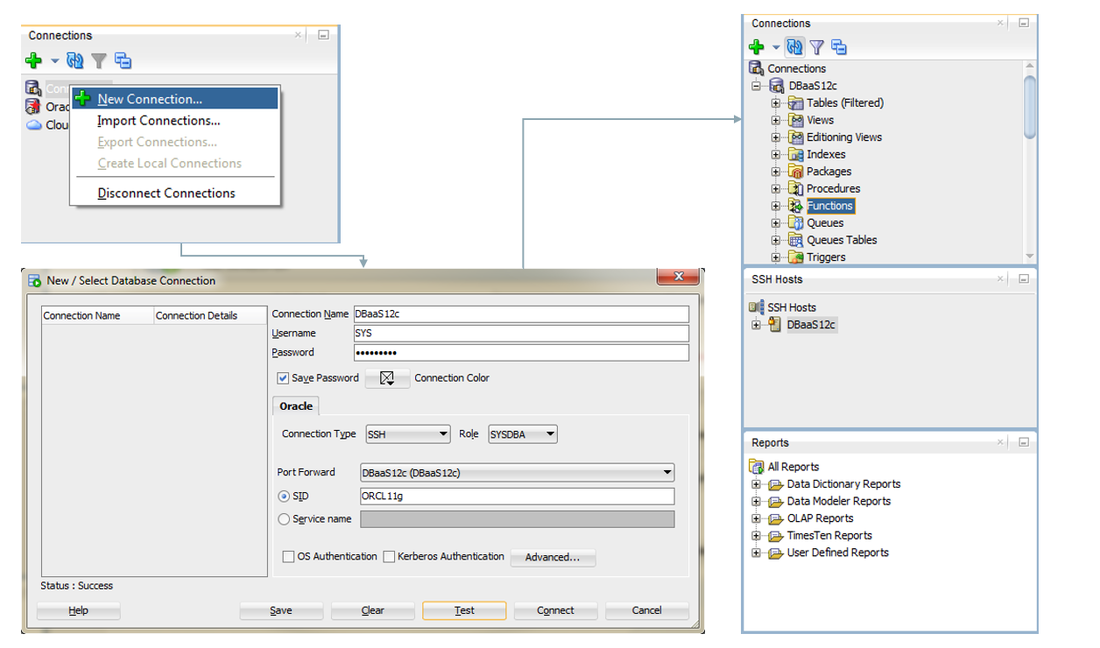
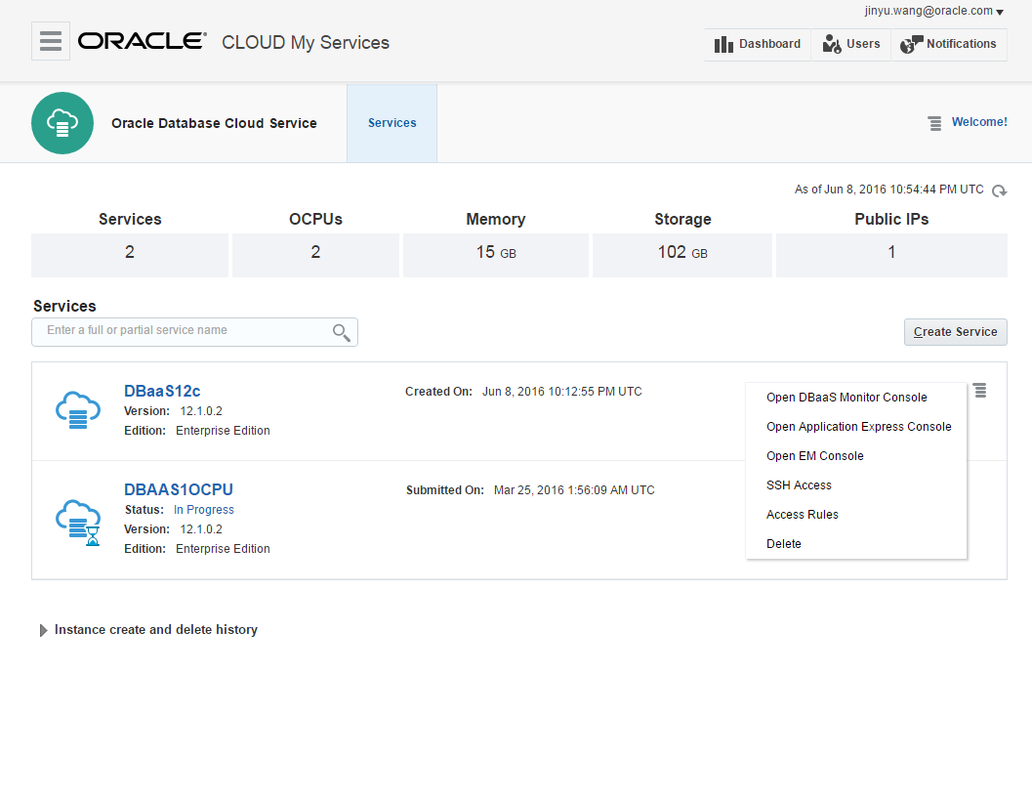
2.1. Using SSH and SQL*Plus Each Database Cloud Service instance has a public IP assigned. You can find the information on the detailed page of each Database Cloud Service instance as shown in the following screenshot. After getting the IP address, you can configure an SSH connection using either using PuTTY or SSH command. You need to provide the hostname (Database Cloud Service IP address), port (22) and the private key for the connection. The following is an example of PuTTY setup. 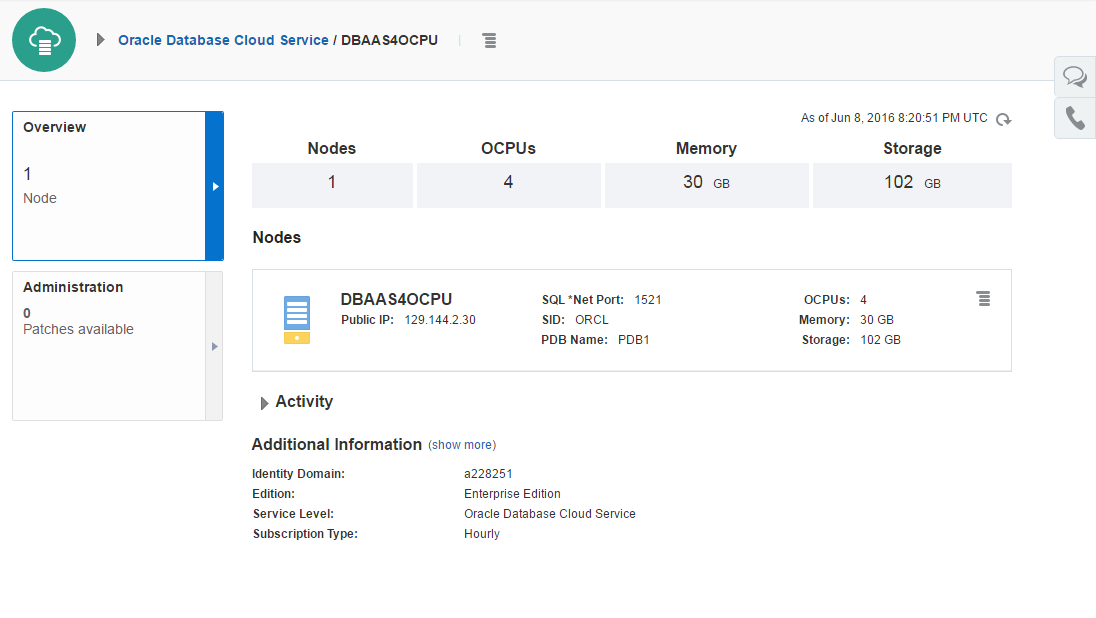
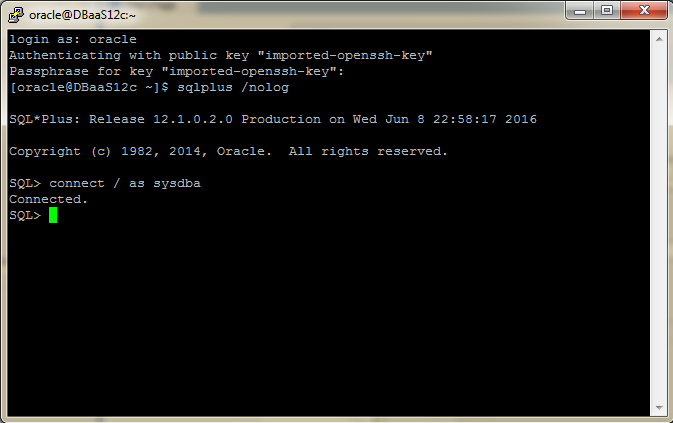
After connecting to the Database CS machine as the oracle user, you can start SQL*Plus to connect to the database server.
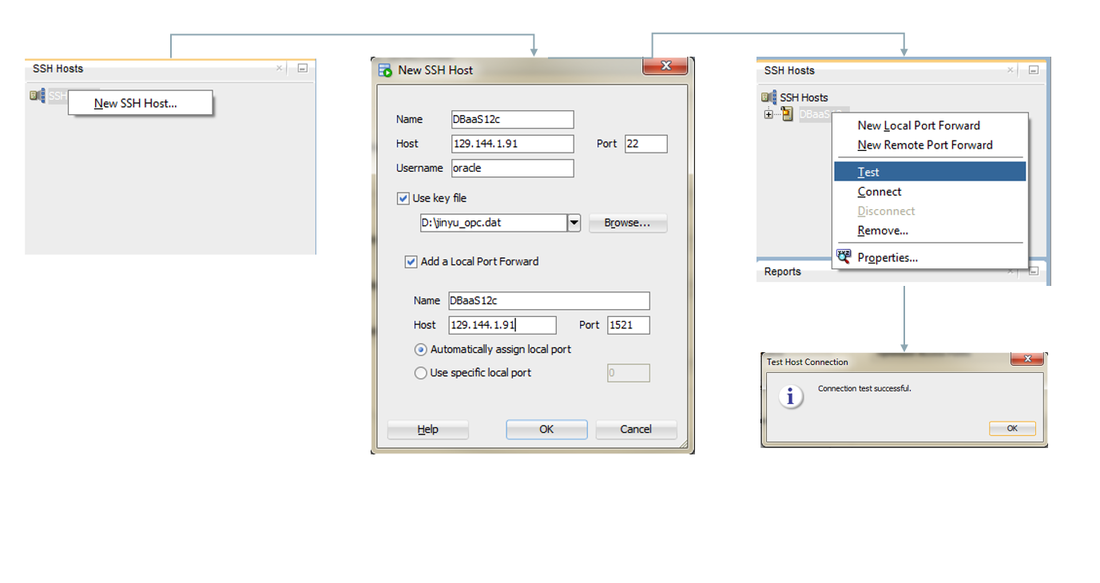
2.2 Using SQL Developer To connect Database CS with SQL Developer, you can follow the instruction described at [2]. This includes setting up an SSH host and then creating a JDBC connection using the SSH tunnel. 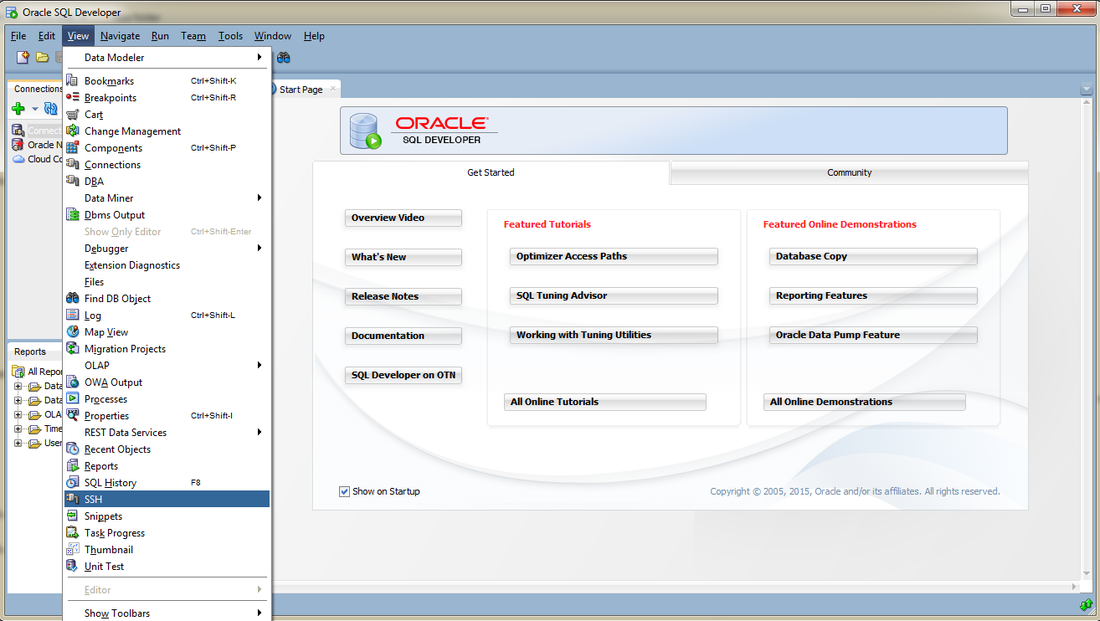
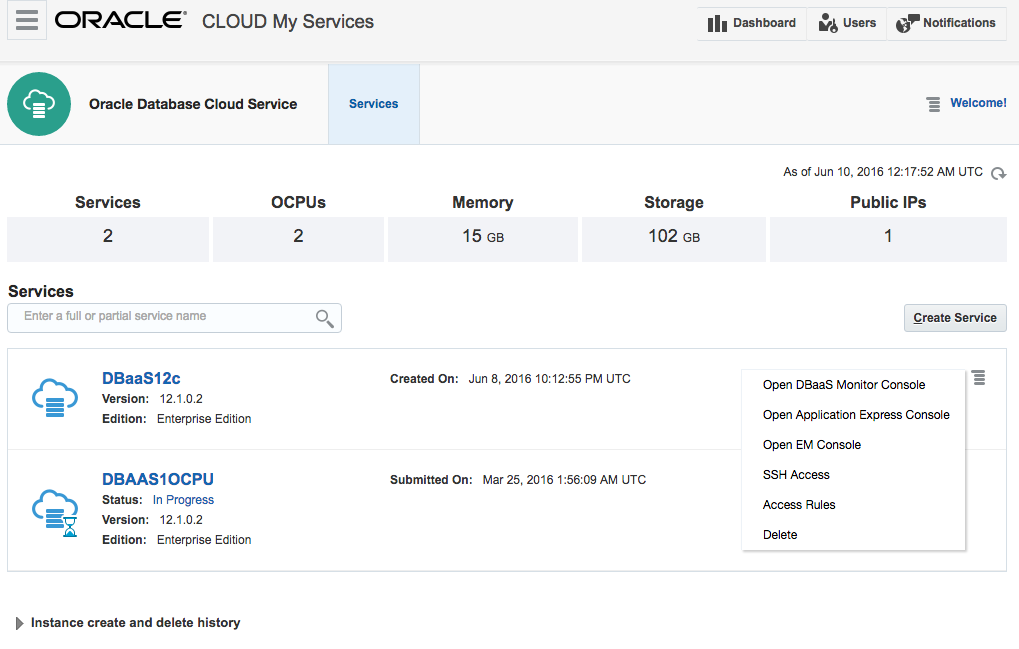
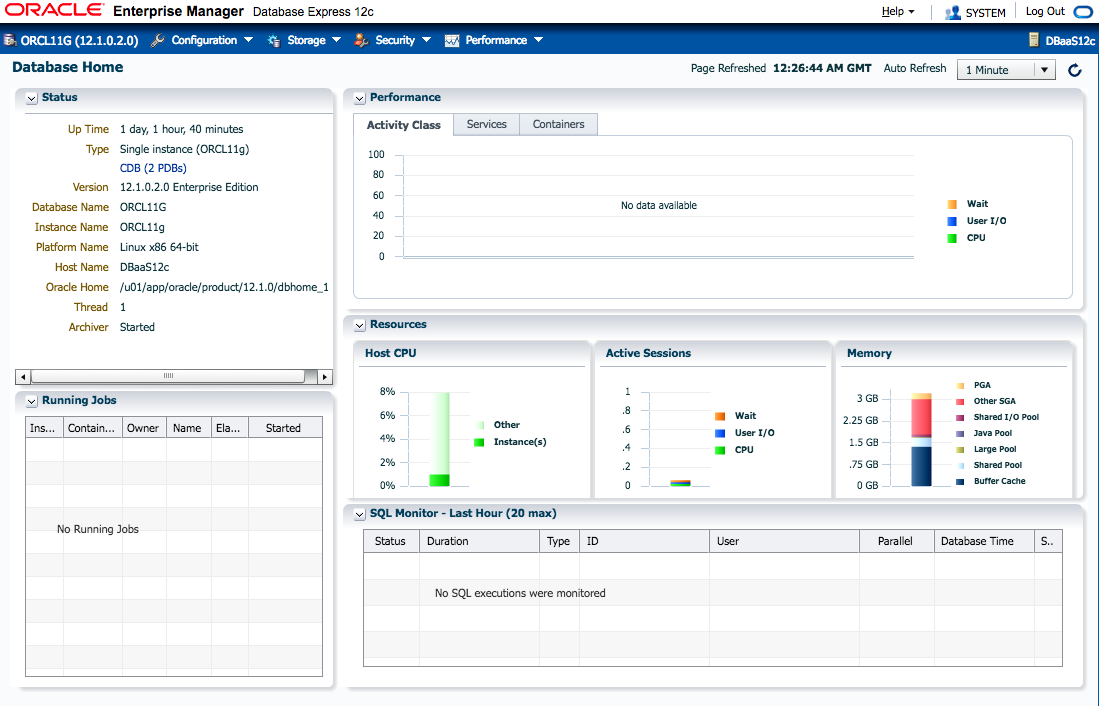
3. Monitoring and Managing the Database Cloud Service Instance
Oracle Database Cloud Service provides tools to manage and monitor database services. The followings are useful when you setup GGCS replications:
ssh -N -L 8080:129.144.2.30:443 [email protected]
ssh -N -L 8081:129.144.2.30:5500 [email protected]
The following is the example of setting up the tunnels using PuTTY [3].
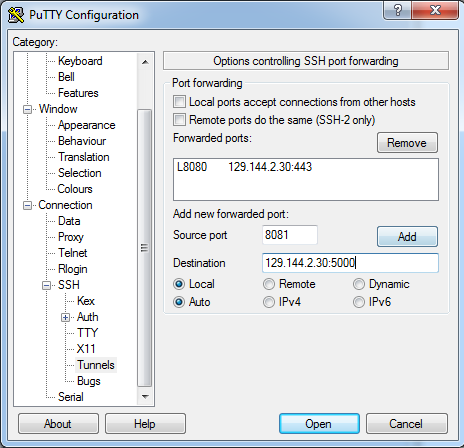
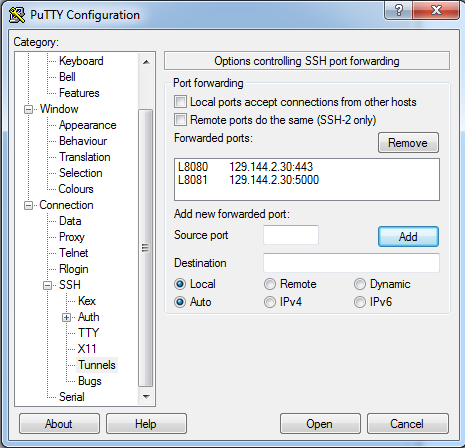
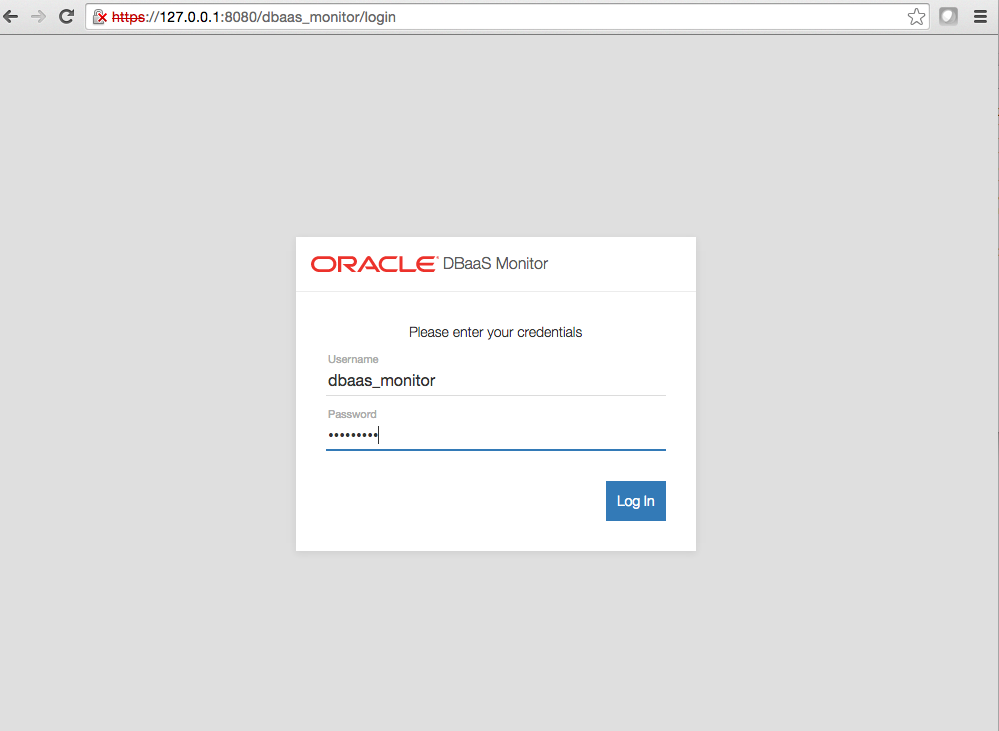
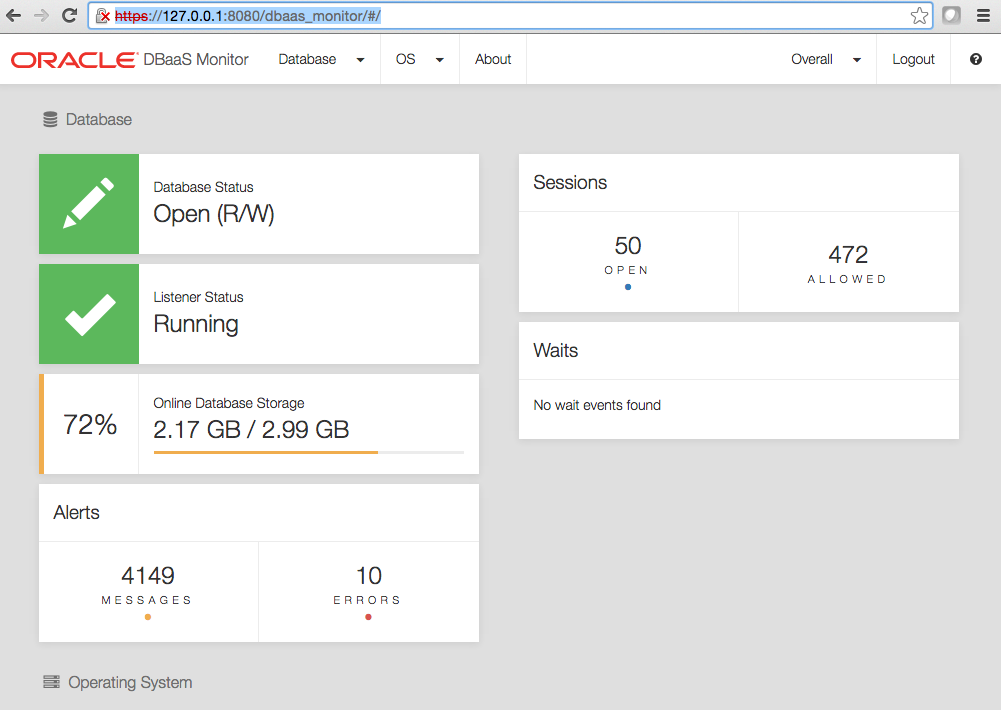
With the SSH tunneling configured, you then can connect to the DBaaS Monitor and the EM Console as follows:
Information: You can also learn more about the SSH connection and SOCK5 Proxy at How To Set Up SOCKS5 Proxy for GoldenGate Cloud Service.
References
|
GoldenGate Cloud ServiceOracle GoldenGate Cloud Service (GGCS) is an extension of Oracle GoldenGate to provide rea-time replication in Cloud. Links
Buzzwords
Disruption Dynamic Mobile Real-Time Security Data-Driven Globalization High Performance Digitization Web Scale Last Updated
March 2018
Categories
All
|

 RSS Feed